

There are an awful lot of 3d modelling tools out there; some are free, some are very expensive, almost all of them are quite intimidating. I took the lead from a chap on the Mortal Engines server, Alec Matthews (who makes magnificent little models for model railways and is the one who inspired me to get into 3d printing at all, really) and started using Tinkercad. I got a bit of stick in other channels for this as “baby’s first 3d design package”, but that’s fine because I’m a baby and this is my first 3d design package.

Tinkercad is free, web-based, and has one real pecularity: rather than the more common draw-and-extrude model, you can only create “negative” and “positive” 3d polygons and apply them to each other. So to make a more complex shape, like a Tudor arch, you need to construct it out of other simpler polygons and combine them; to make a crenellated tower, you need to create a cylinder, a smaller “negative” cylinder inside to cut it out, and then a lot of little cutout bits for the crenels themselves.


Two attempts at a Tudor arch in this system: the first a very poor showing using a rectangle for the doorway, a flattened cylinder for the arch, and a rotated square for the point. The second, after looking into the actual architectural principles of Tudor arches, correctly uses two cylinders for the corners of the arch, a flattened square for the centre, and two more squares to create the doorway and fill in the gaps. These parts can then be combined into an “object” which can be used, positive or negative, to create appropriately shaped holes in things.

This is about as far as I got with the hand-drawn stuff; I was close to giving up and trying a more advanced tool when I discovered Codeblocks. Tinkercad has a function where, rather than wiggle lots of polygons around with keyboard & mouse, you can use code (pre-assembled blocks rather than actually typing it) to create polygons, move them around and apply them to each other. Like a lot of things about Tinkercad, it’s got a difficult, unpolished UI and a Fisher-Price aesthetic, but it’s also very easy to pick up.*

Tinkercad’s limitations aside, this is ideal for repeated geometric structures like the Device Forts. It took about a week of tweaking Deal Castle into multiple stages and assembling the final parts “by hand” (there’s a limit of 200 ‘primitives’ in each codeblocks setup which limits quite how elaborate you can be), but the end results were really quite pleasing.
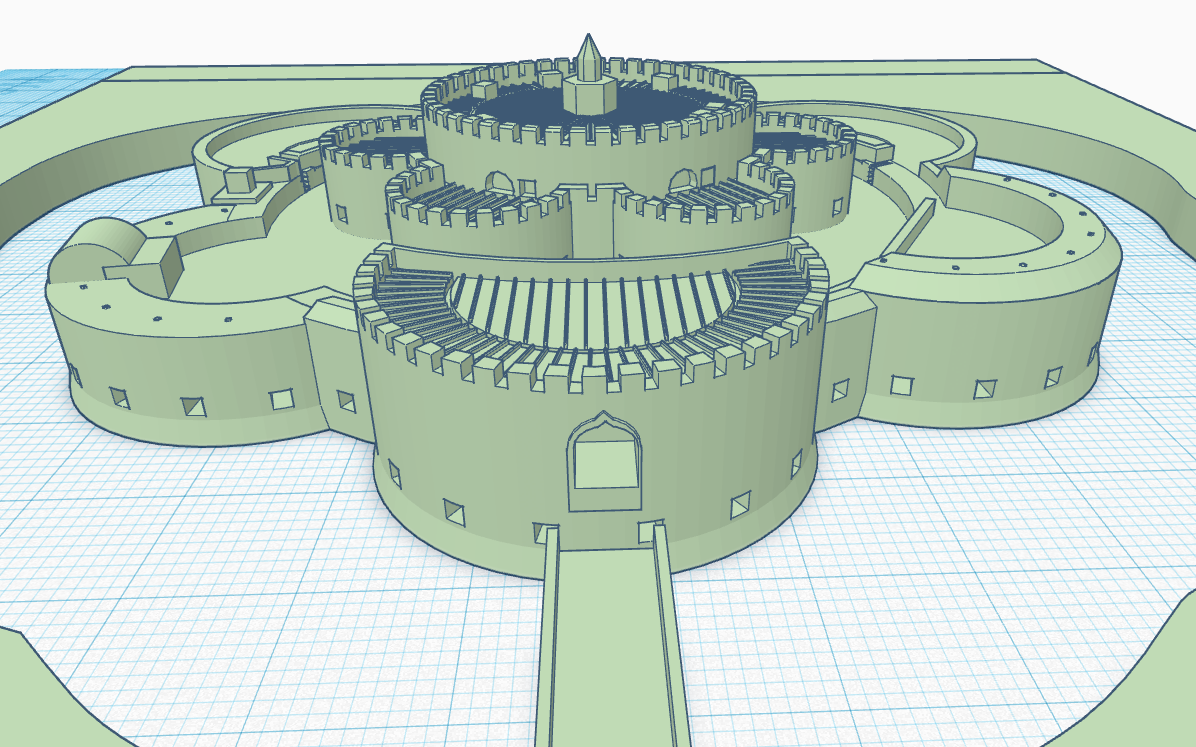
I am going to have to bite the bullet and learn a better tool one day, but for now it’s enough. The eagle-eyed among you will note that there are actually three castles up at the top, of rather different configurations, and next week I’m going to talk about the experience of 3d printing and every good historian’s favourite topic, SOURCES.

* There is something irritatingly half-arsed about the implementation of a lot of features in Codeblocks; in particular, the way it handles shapes which aren’t cylinders or cuboids is absolutely demented. You create a “polygon” and you can determine its shapes and smoothness, but you can’t actually set a size for it, only apply a “scale” modifier which doesn’t correspond to any actual units. It’s purely eyeballing and trial-and-error to get it to the right size.
