I have been rather more constructively engaged over the summer than might have been imagined.*

I have been rather more constructively engaged over the summer than might have been imagined.*
I’ve decided to kick off a long-on-the-backburner creative project in earnest this year, after spending much of last year wondering if I can teach myself to draw (leading to all sorts of private notepad-and-Clip-Studio related tomfoolery.) It turns out I have a really bad mind for the sort of abstract mental shape-rotating I need to draw vehicles and buildings freehand. But I can get decent passable results if I make myself props and work from those.

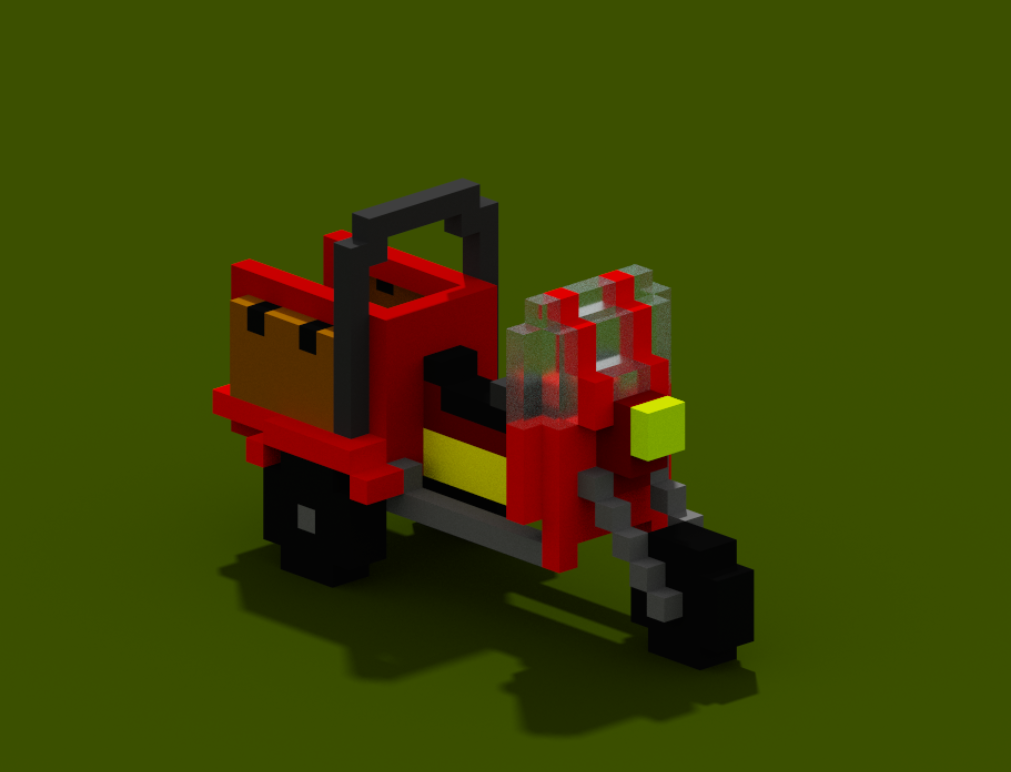
I’ve forgotten pretty much everything I learned about Blender last year, and really just needed a prop that I can wiggle into place to get the rough proportions of a 3d object. So I had a go with Magicavoxel, a very easy-to-learn free open source bit of software that lets you plonk and colour cubes, essentially Lego-style, and it was exactly what I wanted.


Here is the stuff I’ve created to actually use so far: a little one-person cargo trike, and a set of Imaginary Lorries (loosely based on the Alvis Stalwart).
After a previous creative endeavour I’d been planning for this year (a webcomic!) fell through, I’ve picked up the ol’ 3d modelling again – but this time, rather than Tinkercad it’s Blender, rather than Tudor castles it’s late 20th century London housing blocks, and rather than making them for 3d printing (although… I could…) it’s actual mods for Workers & Resources: Soviet Republic.*
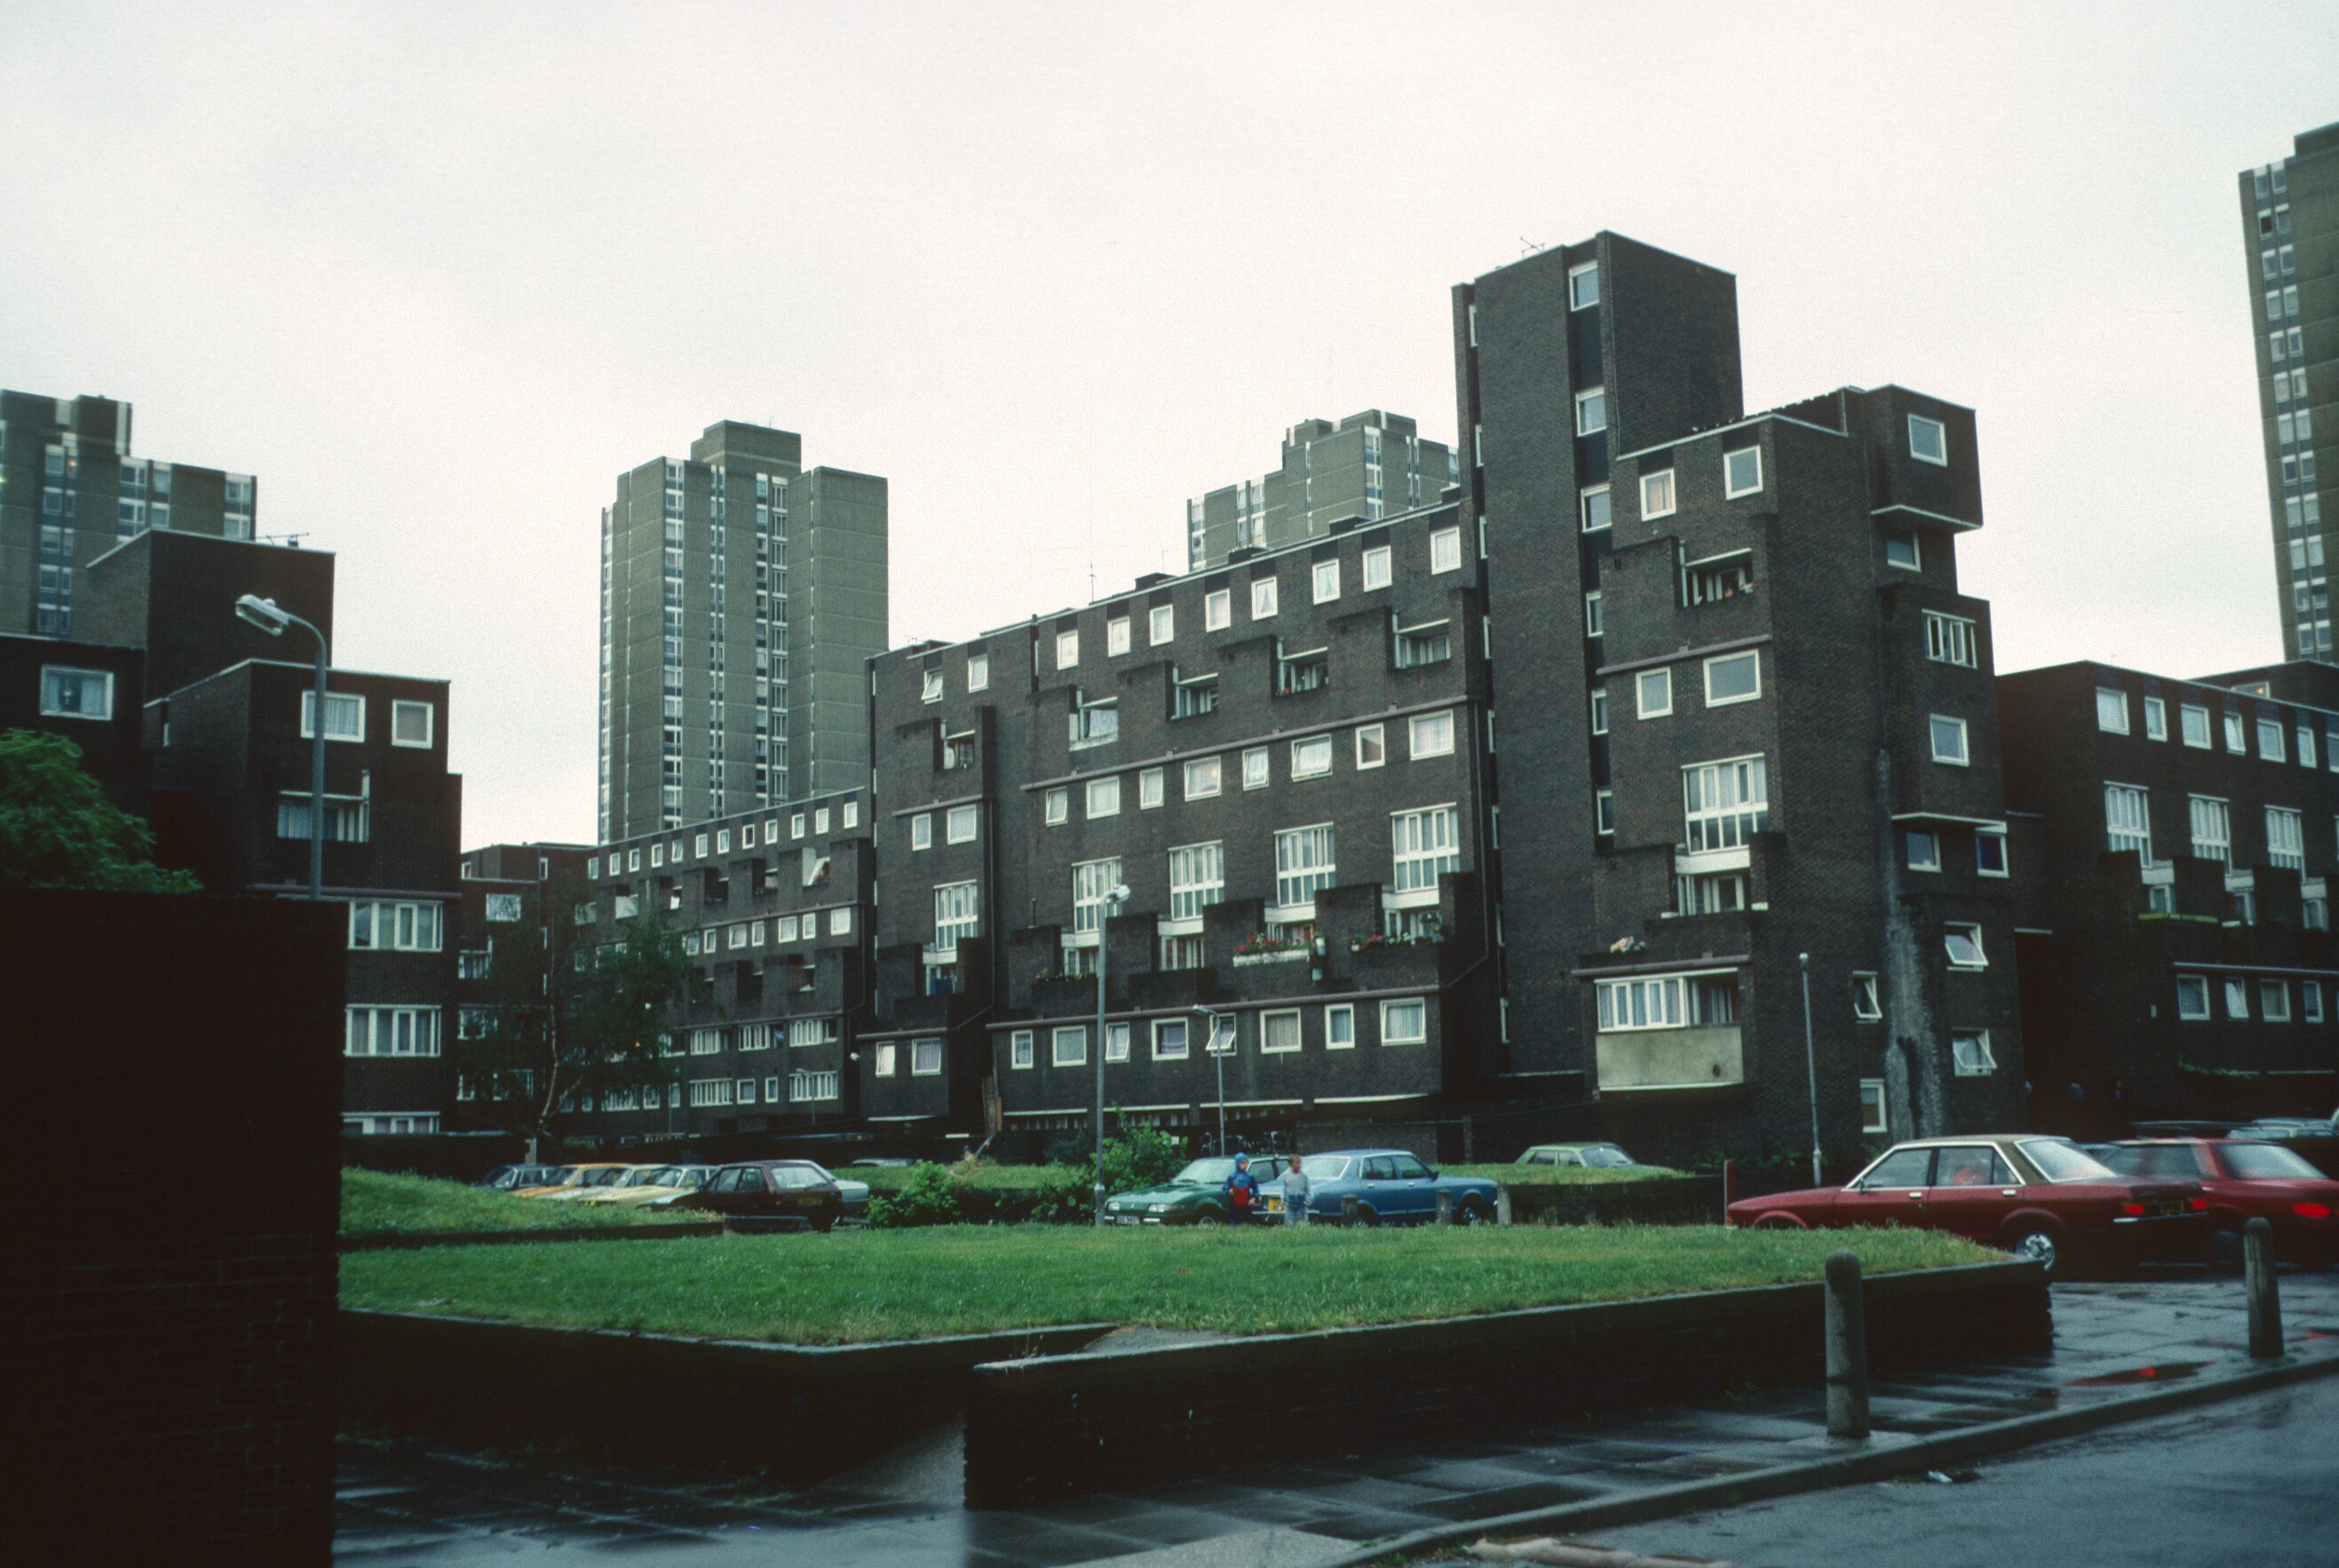
WRSR is set in the 1960s-70s and playing the game involves building many residential blocks (from Resources, to house your Workers). The Ethelred Estate in south London is from exactly the right period and felt like an ideal place to start with my project: it’s got an interesting variety of structures on the “brown residential ziggurat” theme, a striking palette of chocolate-brown bricks, white window frames and – a lovely unifying thing throughout the whole estate – the same royal-blue on all the doors, fences, bollards.**
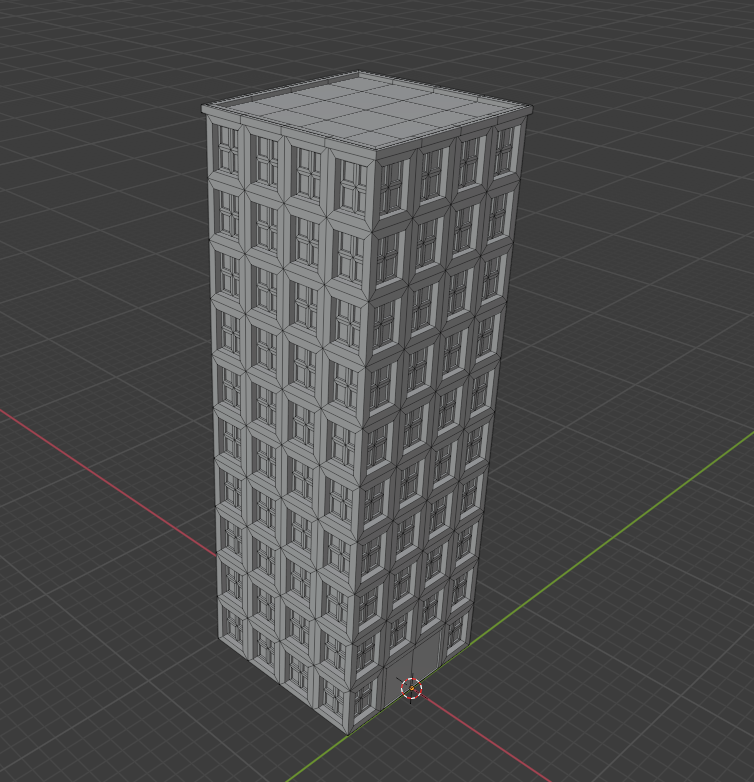
TinkerCAD, my only previous modelling experience, is very simple and designed to be easy to pick up. Blender, by contrast, is a professional piece of software, monstrously capable and complicated, with a bewildering array of buttons and hotkeys. Happily, a youtuber going by OffTheRailsGaming has made a tutorial series designed specifically for WRSR modding, which was very helpful in getting started. The approach I’ve taken (similar, it seems, to the actual architects!) – is creating a variety of 2.5×2.5m segments which can then be assembled together.
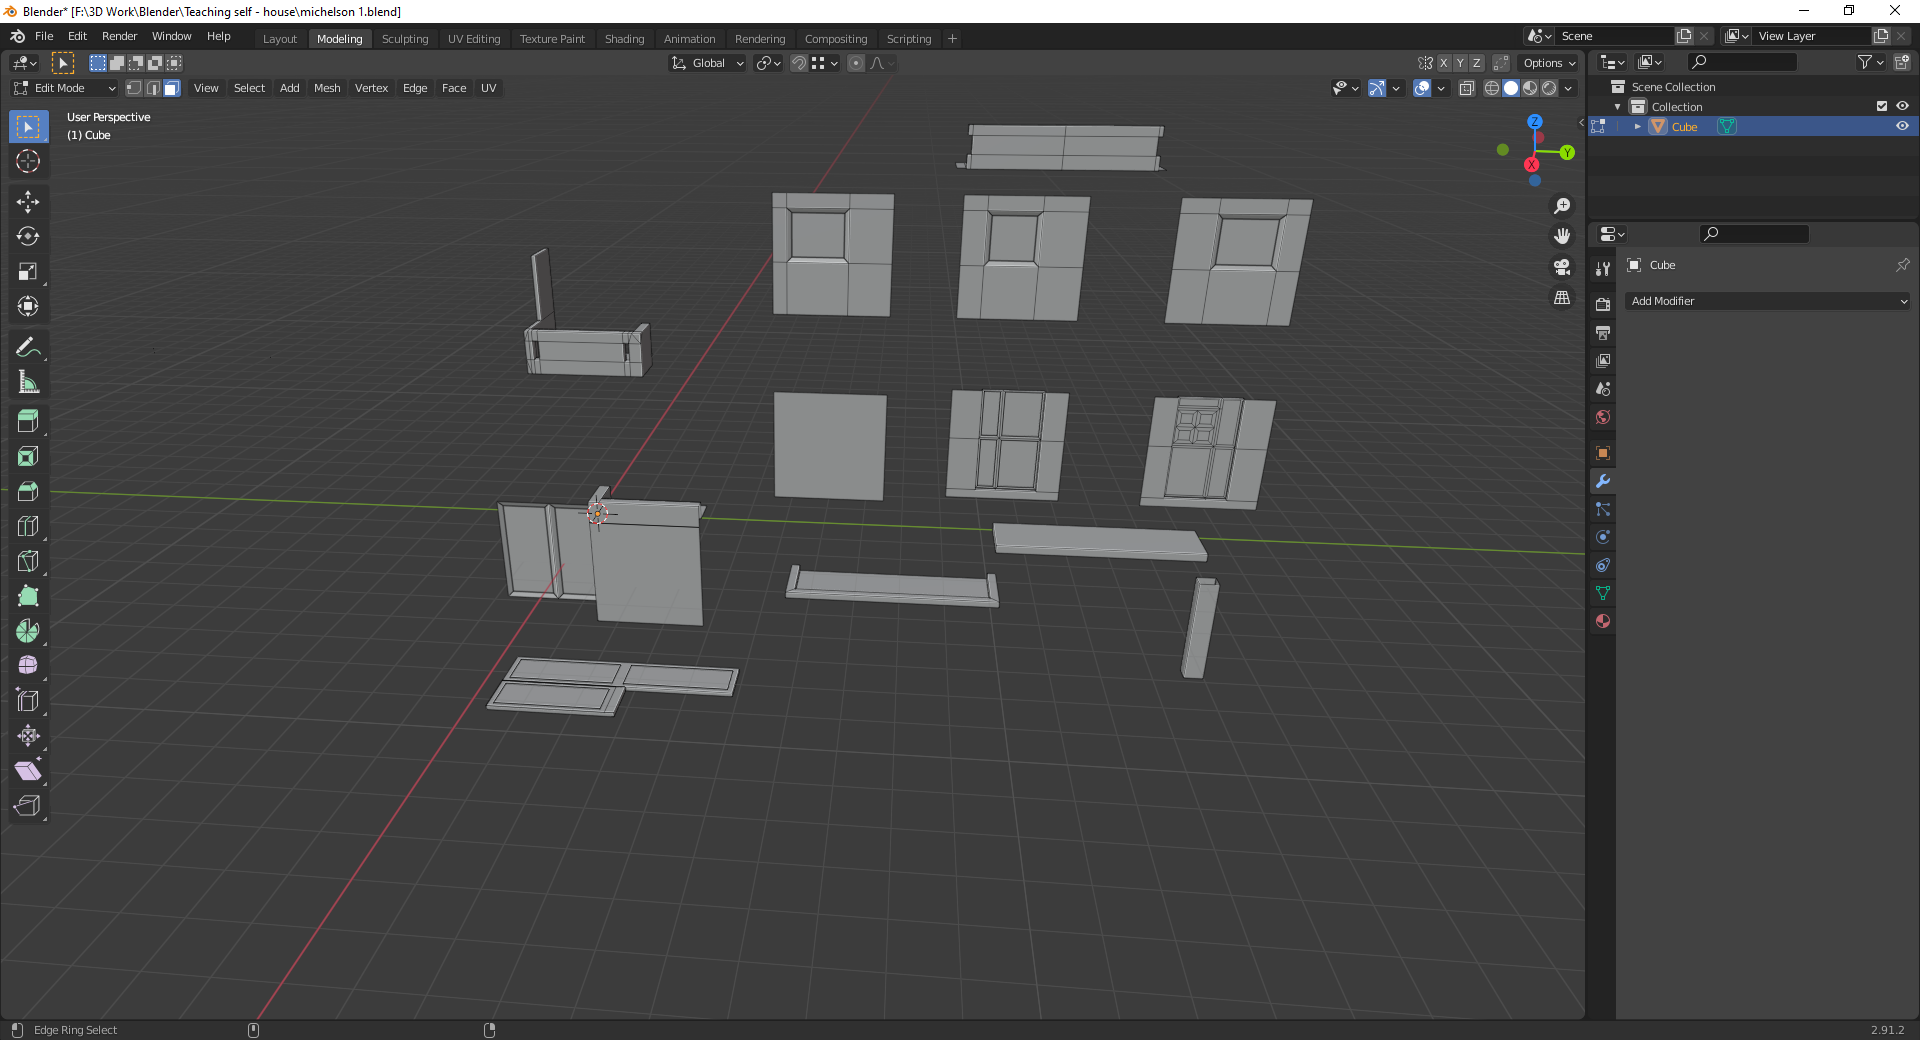
That, with placeholder textures based on photos I snapped, combined with the simple but desperately tiresome process of UV mapping to get me to this.
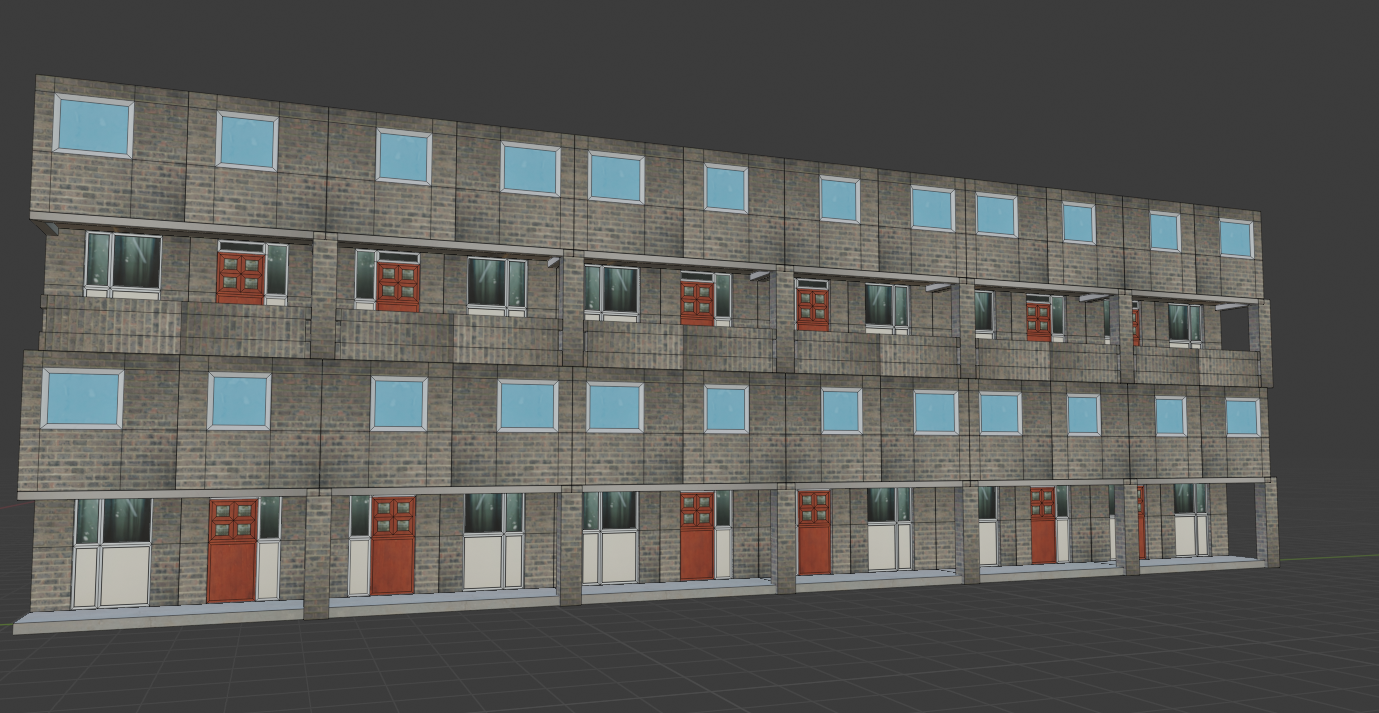
Having mostly modelled the building, it was time for MORE UV MAPPING with some better textures, based mostly on actual photographs of the estate I took. There’s a neat, albeit clunky, tool called Shoebox which is great for turning photograph elements into textures, and someone else on the WRSR modders’ Discord server had been going through the exact same journey as I had so I could copy their own experiences.

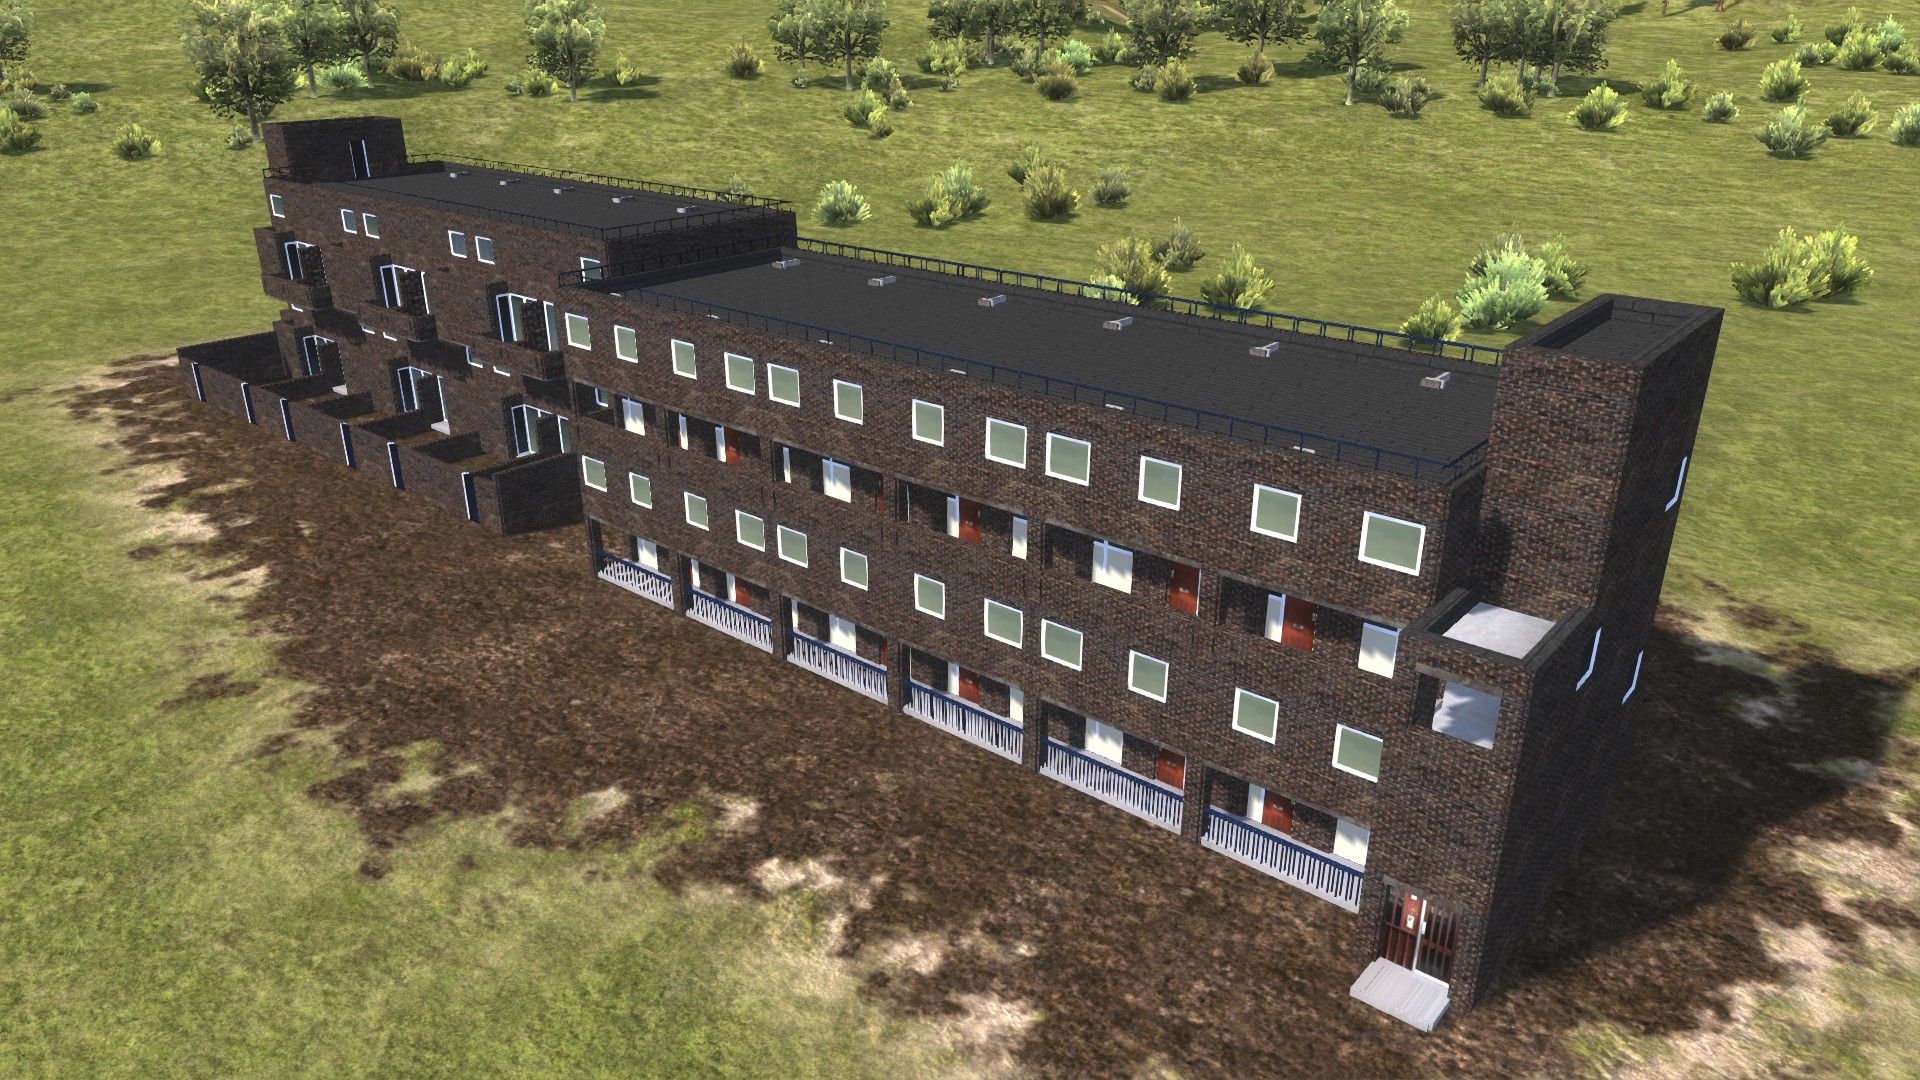
Then, actually getting it into the game! This is a whole, tedious step-by-step process of loading files in one format into specialised bits of software and extruding them as others. I benefited from another tutorial by Chris Brammer, a list of documentation by LovelyPL on the Steam workshop and a lot of fiddling around with scripting – the (very) basic programming to make sure the game has the information about which files your building is in, how much it should cost to build, where paths come from it, etc. The game will automatically generate costs, but you can set them manually; I changed mine to cost more bricks and concrete but less steel than average for a block of flats (partly because they’re low rises, partly to encourage people to use them – steel is a pricey resource and takes a lot of investment to make yourself.) At last, into the game!

This immediately showed a bunch of other problems. It turns out I needed to create things called mipmaps (which paint.net does very handily) to make the textures look less horrible when zoomed out, and to adjust the script files to make the building less overlit (I also changed the textures to darken the greys and whites.) Most complicated was scaling – I built these at actual size, but WRSR’s internal scaling is a bit odd and my blocks looked too small next to other buildings. I had a long discussion which involved horrifying several modders from ex-Soviet countries with how tiny UK housing stock actually is (the segments here are 2.5m square; in 1960s communist Poland the standard was 2.7m, later increased because that was “too claustrophobic”). I settled on resizing my creations to 110% so they didn’t look too outlandish.

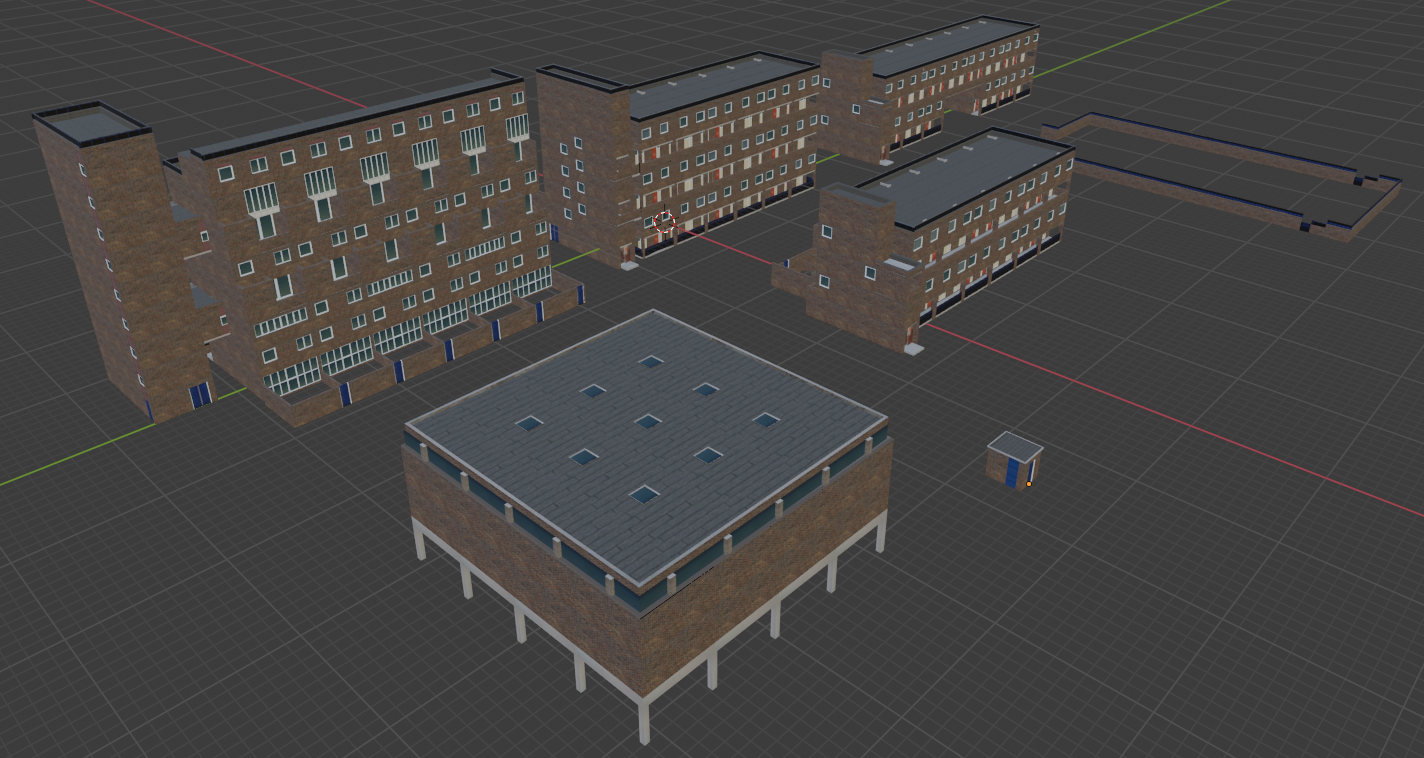
Finally, I had to upload it to the Steam workshop, so here it is! Almost 400 people have downloaded it at time of writing, which is lovely. To follow up, I’ve made a few more – some of the different Ethelred buildings (which turn out to be really quite varied when you look closely), a gym based on the nearby Vauxwall Climbing Centre, a car park and power substation. There are many more things I can and probably will end up doing when the game comes fully back online – a shopping centre based on the old one on Lambeth Walk,*** monuments based on the Ethelred TMO gates and the flowerbeds. It’s been a fun project both in terms of learning more skills and in encouraging me to really look closely at my neighbourhood. But now, alas, I keep seeing interesting 70s tower blocks in London and thinking “ooh, YOU’D do well in WRSR…”
* At the exact time I started to get into this, WRSR has suffered a horrible attack from a deranged former fan using frivolous lawsuits to… well, I don’t know exactly what he intends to achieve at this point except to hurt a small games studio. So the game’s Steam page and its site are currently down due to frivolous DMCA takedown requests. I have every confidence they’ll win in the end but I’m going to hold off adding new mods until it’s back up.
** Although from older photos it looks like this – much like Tower Bridge – was originally chocolate brown. Much like Tower Bridge, the blue is better.
*** The earlier Ethelred Estate included developments on both sides of Lambeth Walk, and a fully pedestrianised shopping precinct, like a sort of downmarket Brunswick Centre. Half of it has now been torn down and the road reopened – you can see the same view of the “then” here and the “now” here.
If you’d like to purchase any of the results of this history-and-design experiment you can do so at my Etsy store here. Deal is up right now, Walmer will be soon!

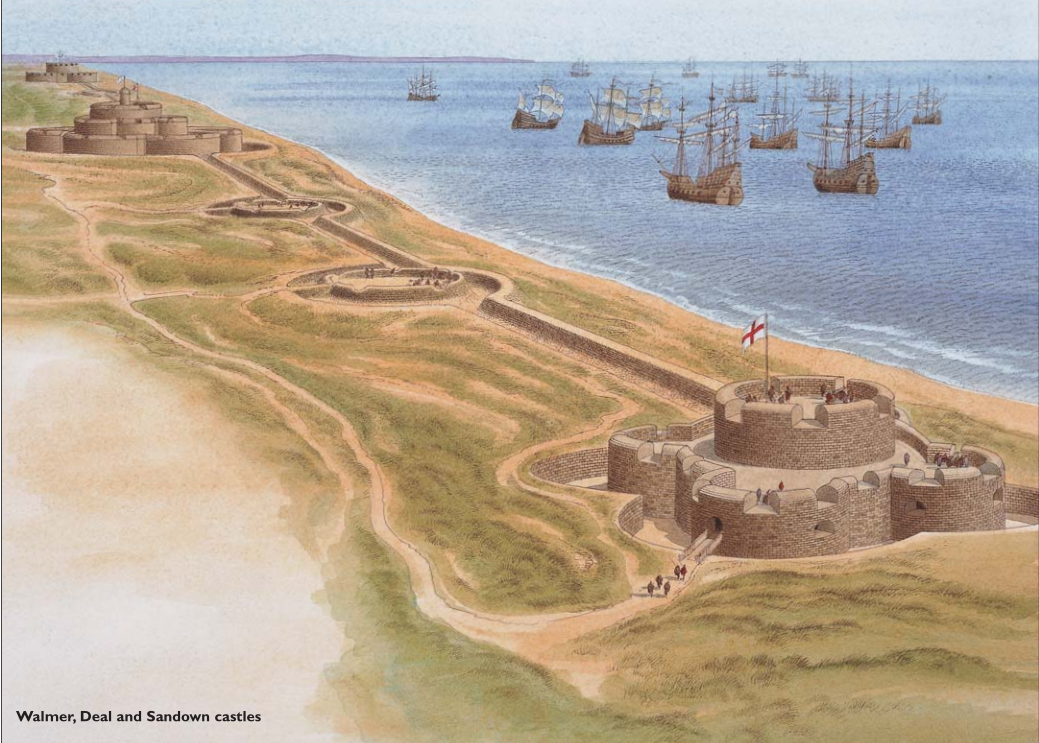
In producing these forts I’m striving to be as accurate as possible, but as any historian knows your conclusion can only be as good as your sources. Deal was ideal for several reasons: the overall structure isn’t nearly as mucked-about-with as other Device Forts (only St Mawes is really completely intact – Southsea and Walmer are barely recognisable) but the English Heritage page on its history is absolutely excellent and has a bunch of primary sources and historical depictions right there. For other castles I had to spend a while delving into other archives, mainly Historic England’s document library and the British Library. I also used some reconstructions in an Osprey book – but that had some problems, more on that later.
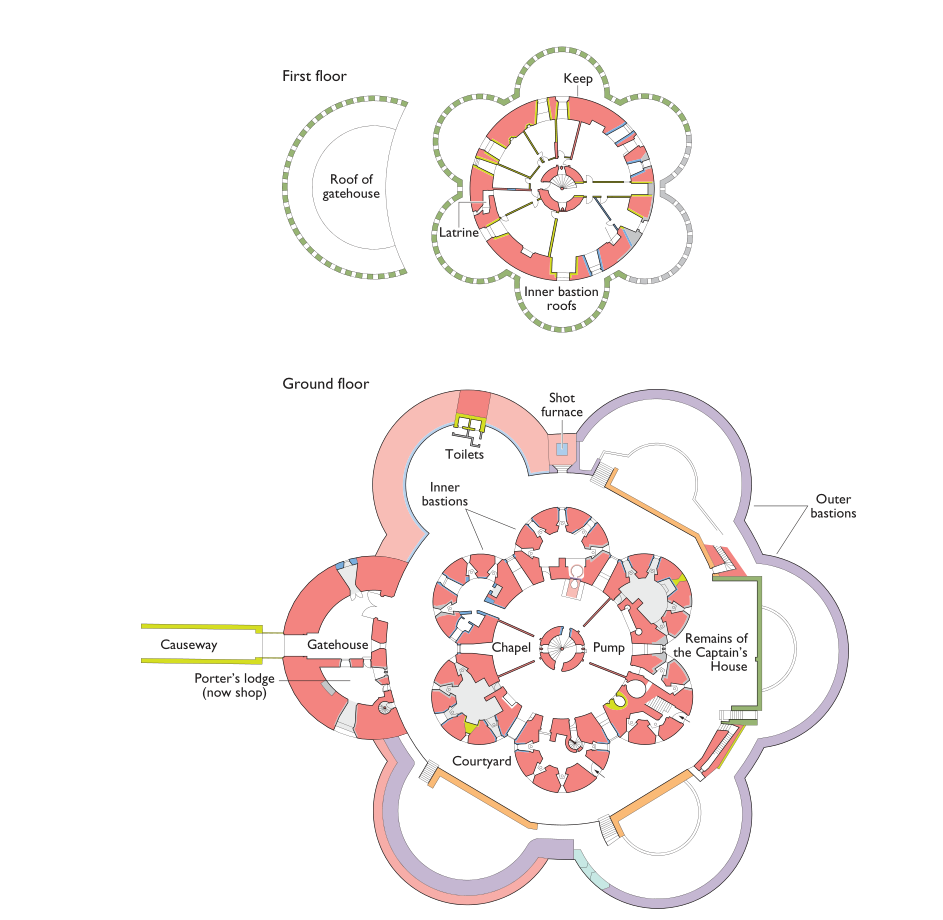
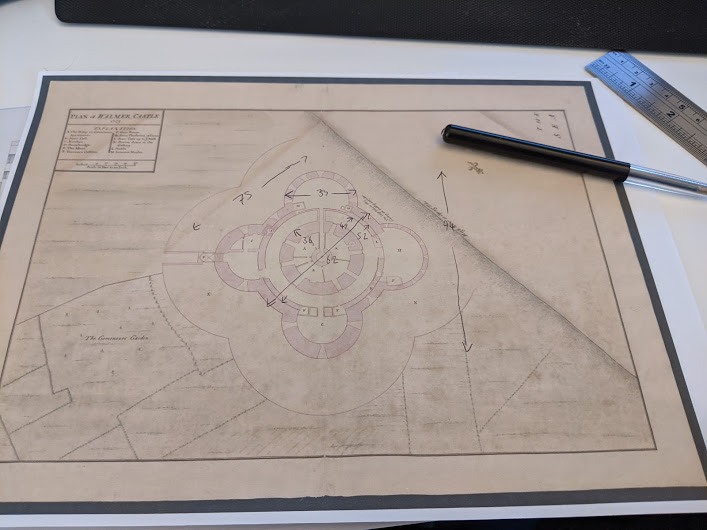
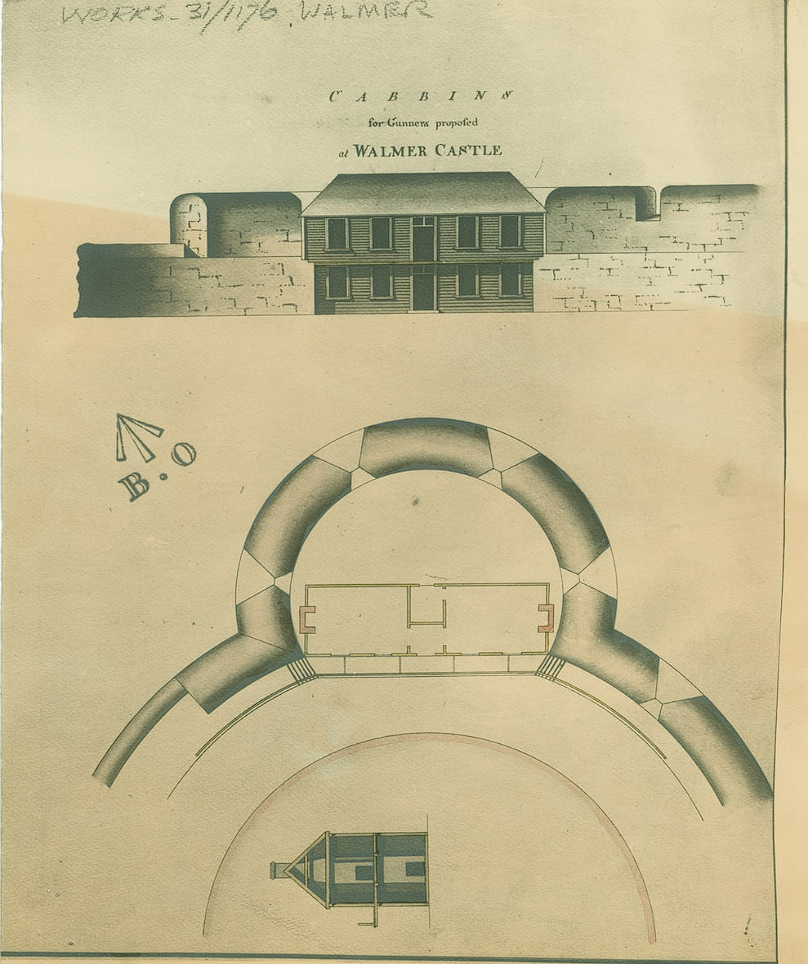
EH have a modern, lovely, very clear plan of Deal Castle right on their website, but for Walmer, the relevant page on the EH website is down and the structure has anyway changed much more radically in the last 470 years. In getting the dimensions for the base model and the layout of gunports etc I had to use much older, fuzzier maps; I made detailed measurements via the very old-fashioned expedient of printing off the plans and using a ruler for the relevant measures. (I found this ratio calculator really helpful for on-the-fly calculations.)

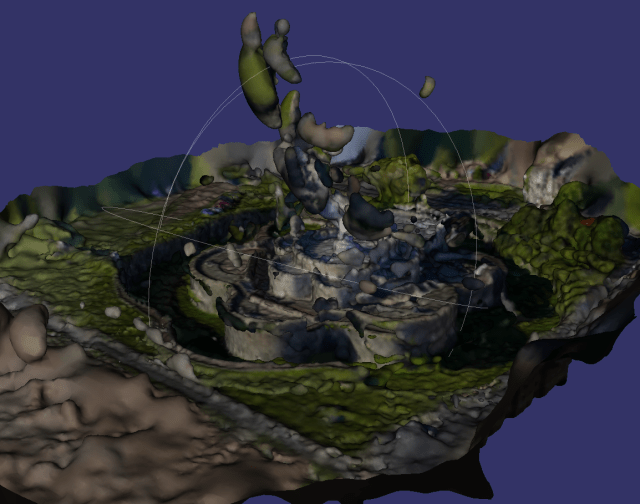
This was the easiest part to find good sources on, as, writing in the year of our lord 2021, drone overflights of interesting buildings are everywhere (have a look at this guy’s channel of remote Georgian fortresses and monasteries). For Deal I had a large number of high-res photos extracted from the unsuccessful photogrammetry experiment; for Walmer I found, as part of the same photogrammetry research, this exquisite 3d model produced from drone footage (this video, I think) which was itself great for checking tiny details.** However, this meant that I spent an absolutely silly amount of time on the roof tiles, chimneys etc etc which maybe I shouldn’t have.


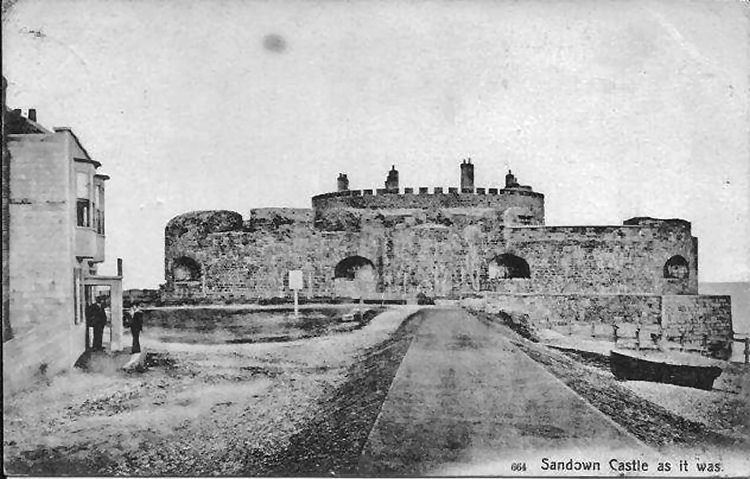
Three views of Sandown/Walmer before and during their later transformation.
Now, this was much harder! There are loads of contemporary engravings showing the rough shape of the bastions (masonry parapets with rounded tops. and deep angled gunports), but a fair few of these are quite “figurative” and exaggerate certain proportions. Sandown castle was architecturally nearly identical to Walmer, so I had twice as many search terms, but there aren’t a lot of good plans of it about either. I did, however, find an 1860s photograph*** taken before it – as one source wonderfully put it – ‘became sport for the waves’.
I was able, from what little is left of the existing structures, to replicate the battlements and to conjure up a fairly convincing set of dimensions, but something that we may never be certain about is what the central keep looked like (although we know there weren’t any gunports in the sides). I’ve done my best based on the available sources and similar design features in other Device Forts, but it is sadly still a bit speculative.
Long time readers will be aware of my fondness for Historians’ Disagreements from way back in the A-Z of the IWOME. However, when it comes to assembling something from disparate sources, they are a huge headache! Here are two sources I looked at and dismissed elements of:
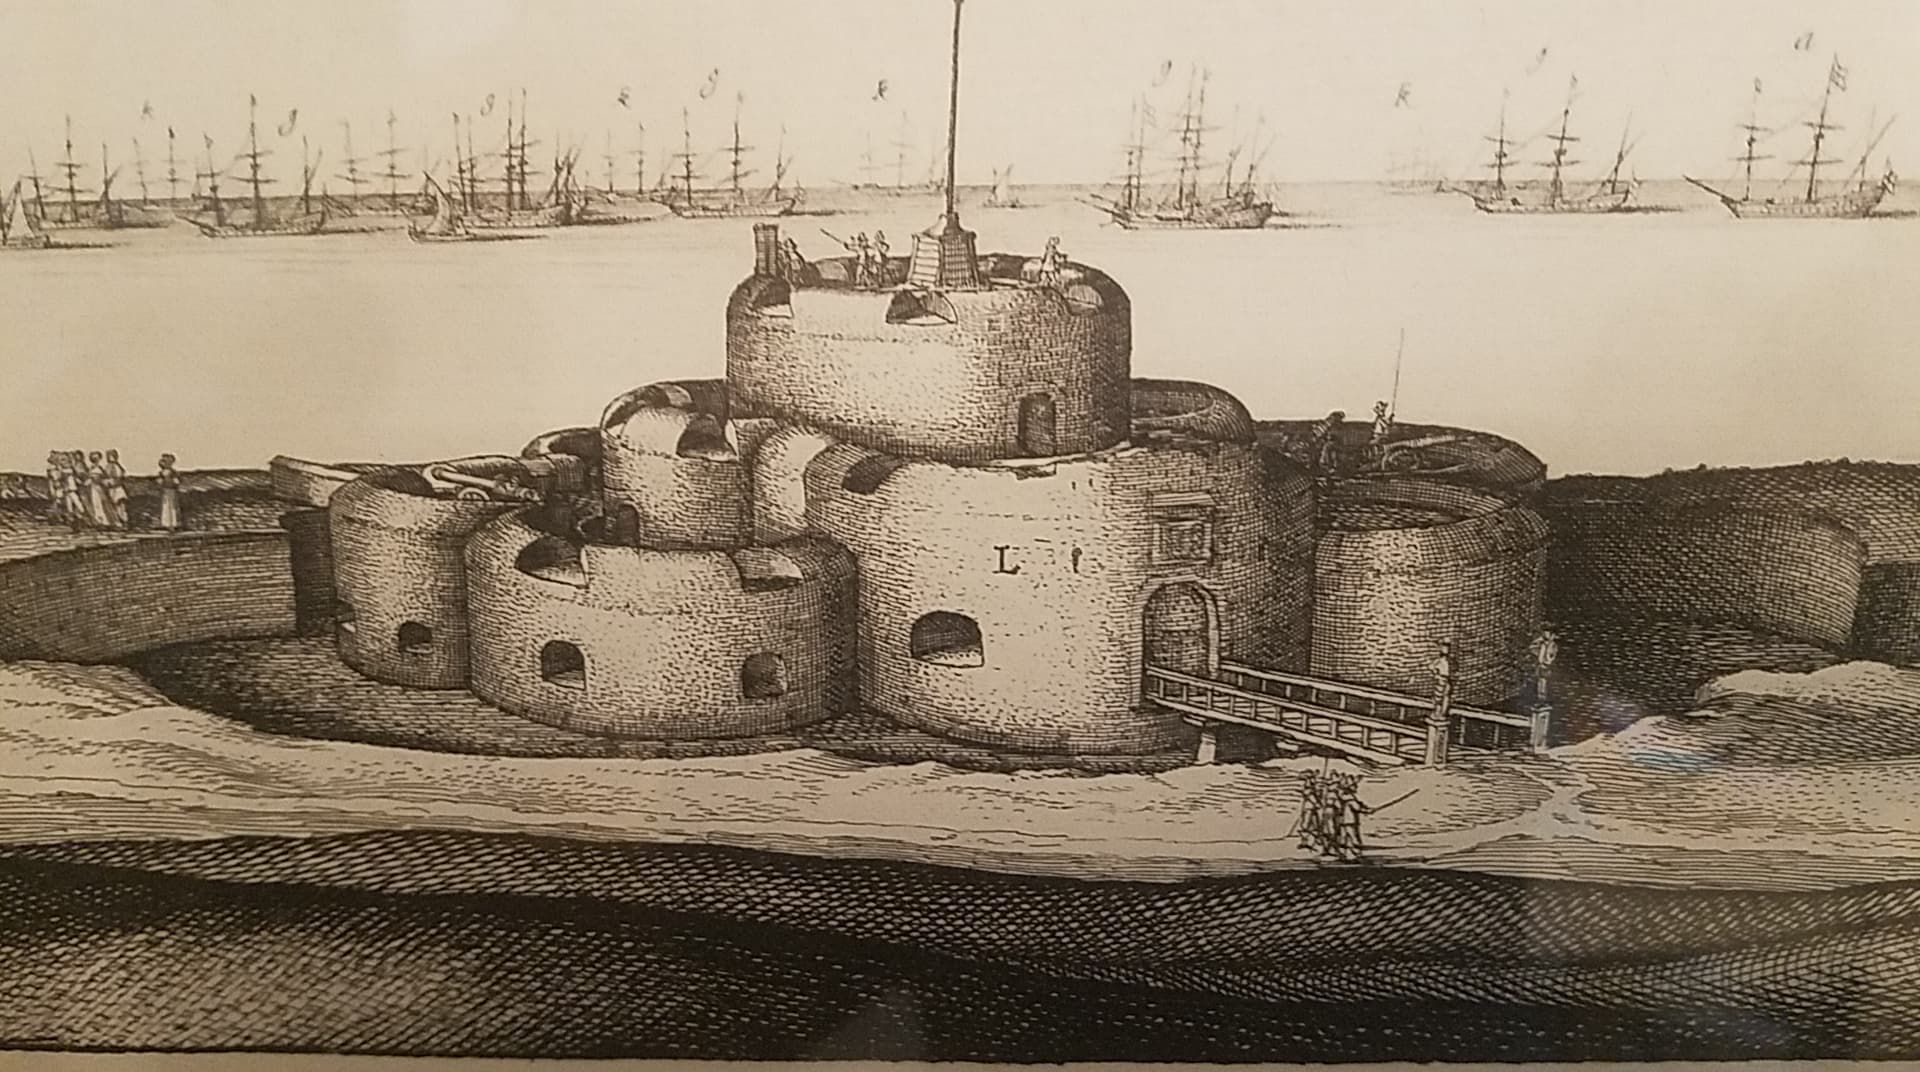
Meanwhile, this is an old engraving of Deal Castle which shows each bastion having two or three huge gunports rather than a bunch of small ones. This horrified me initially – but a fair bit of research, including helpful Youtube videos from tourists in the basement, convinced me that the original gunloops were correct and the engraver here had made a mistake (or not bothered to look closely at Deal’s base and just copied Walmer/Sandown.)This post has already got really quite long, so I think I’m going to split off the bit on 3d printing to a fourth and then polish up some old travelogues for a change. As a final note I’d like to recommend two websites: http://www.starforts.com/ and http://www.fortified-places.com/fortresses.html. I love these sites partly for their content, which is Really Quite Good, and partly because they feel like charming relics of a better, more innocent era of the internet.*
* Also a time where we as individuals had more agency in choosing what we read, before it was all social meeja algorithms honing your feed for whatever makes you angriest. I realise this sort of whinge permanently consigns me to the ash-heap of crotchety old men railing against scary new changes, but what we have now really is terrible.
** But it says ‘free download 3d model’, I hear you cry – why not extract this and work from there? Because, being based on photogrammetry techniques, this is both more detailed and lower ‘resolution’ than I need, and uses a mixture of the model and textures to achieve visual fidelity. If I tried to 3d print this, it would have a chaotic mushiness to it – the overall shape would be OK but the fine detail would be no good for my purposes.
*** Wonderfully, this is from a local history site talking about pubs: http://www.dover-kent.com/Good-Intent-Sandown.html

There are an awful lot of 3d modelling tools out there; some are free, some are very expensive, almost all of them are quite intimidating. I took the lead from a chap on the Mortal Engines server, Alec Matthews (who makes magnificent little models for model railways and is the one who inspired me to get into 3d printing at all, really) and started using Tinkercad. I got a bit of stick in other channels for this as “baby’s first 3d design package”, but that’s fine because I’m a baby and this is my first 3d design package.

Tinkercad is free, web-based, and has one real pecularity: rather than the more common draw-and-extrude model, you can only create “negative” and “positive” 3d polygons and apply them to each other. So to make a more complex shape, like a Tudor arch, you need to construct it out of other simpler polygons and combine them; to make a crenellated tower, you need to create a cylinder, a smaller “negative” cylinder inside to cut it out, and then a lot of little cutout bits for the crenels themselves.


Two attempts at a Tudor arch in this system: the first a very poor showing using a rectangle for the doorway, a flattened cylinder for the arch, and a rotated square for the point. The second, after looking into the actual architectural principles of Tudor arches, correctly uses two cylinders for the corners of the arch, a flattened square for the centre, and two more squares to create the doorway and fill in the gaps. These parts can then be combined into an “object” which can be used, positive or negative, to create appropriately shaped holes in things.

This is about as far as I got with the hand-drawn stuff; I was close to giving up and trying a more advanced tool when I discovered Codeblocks. Tinkercad has a function where, rather than wiggle lots of polygons around with keyboard & mouse, you can use code (pre-assembled blocks rather than actually typing it) to create polygons, move them around and apply them to each other. Like a lot of things about Tinkercad, it’s got a difficult, unpolished UI and a Fisher-Price aesthetic, but it’s also very easy to pick up.*

Tinkercad’s limitations aside, this is ideal for repeated geometric structures like the Device Forts. It took about a week of tweaking Deal Castle into multiple stages and assembling the final parts “by hand” (there’s a limit of 200 ‘primitives’ in each codeblocks setup which limits quite how elaborate you can be), but the end results were really quite pleasing.
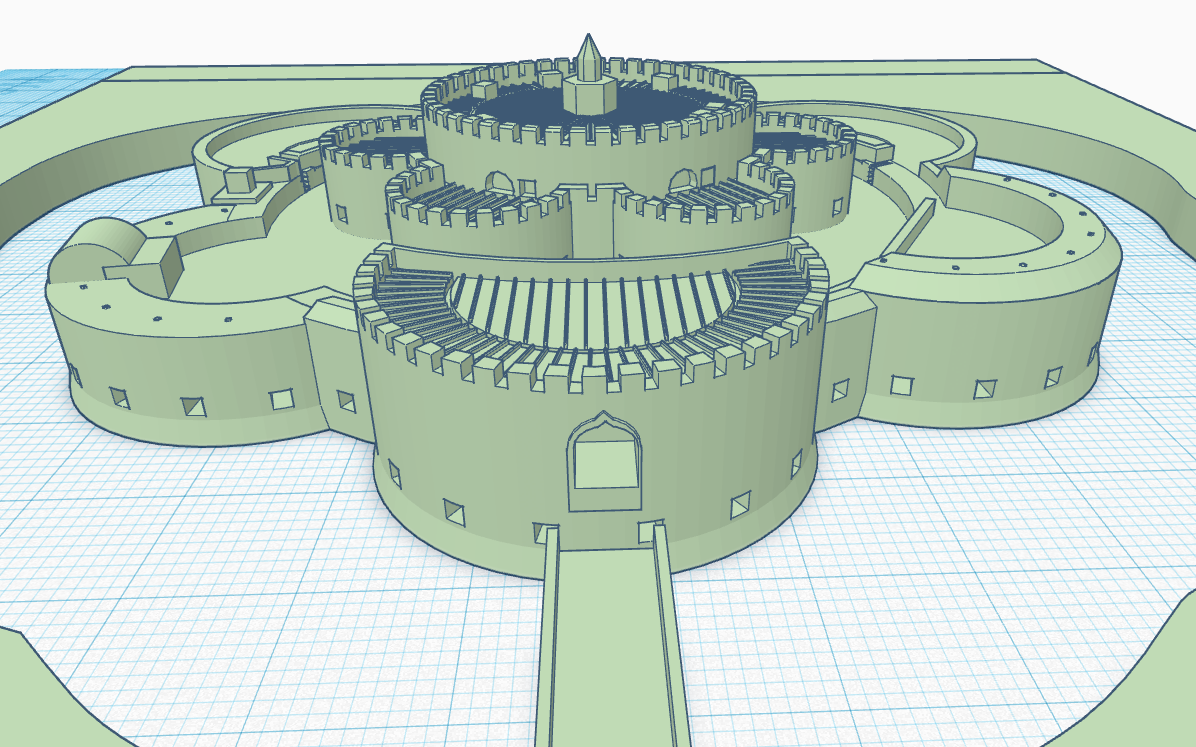
I am going to have to bite the bullet and learn a better tool one day, but for now it’s enough. The eagle-eyed among you will note that there are actually three castles up at the top, of rather different configurations, and next week I’m going to talk about the experience of 3d printing and every good historian’s favourite topic, SOURCES.

* There is something irritatingly half-arsed about the implementation of a lot of features in Codeblocks; in particular, the way it handles shapes which aren’t cylinders or cuboids is absolutely demented. You create a “polygon” and you can determine its shapes and smoothness, but you can’t actually set a size for it, only apply a “scale” modifier which doesn’t correspond to any actual units. It’s purely eyeballing and trial-and-error to get it to the right size.
I’ve taught myself something new: here is a very tiny Deal Castle, made entirely by me!
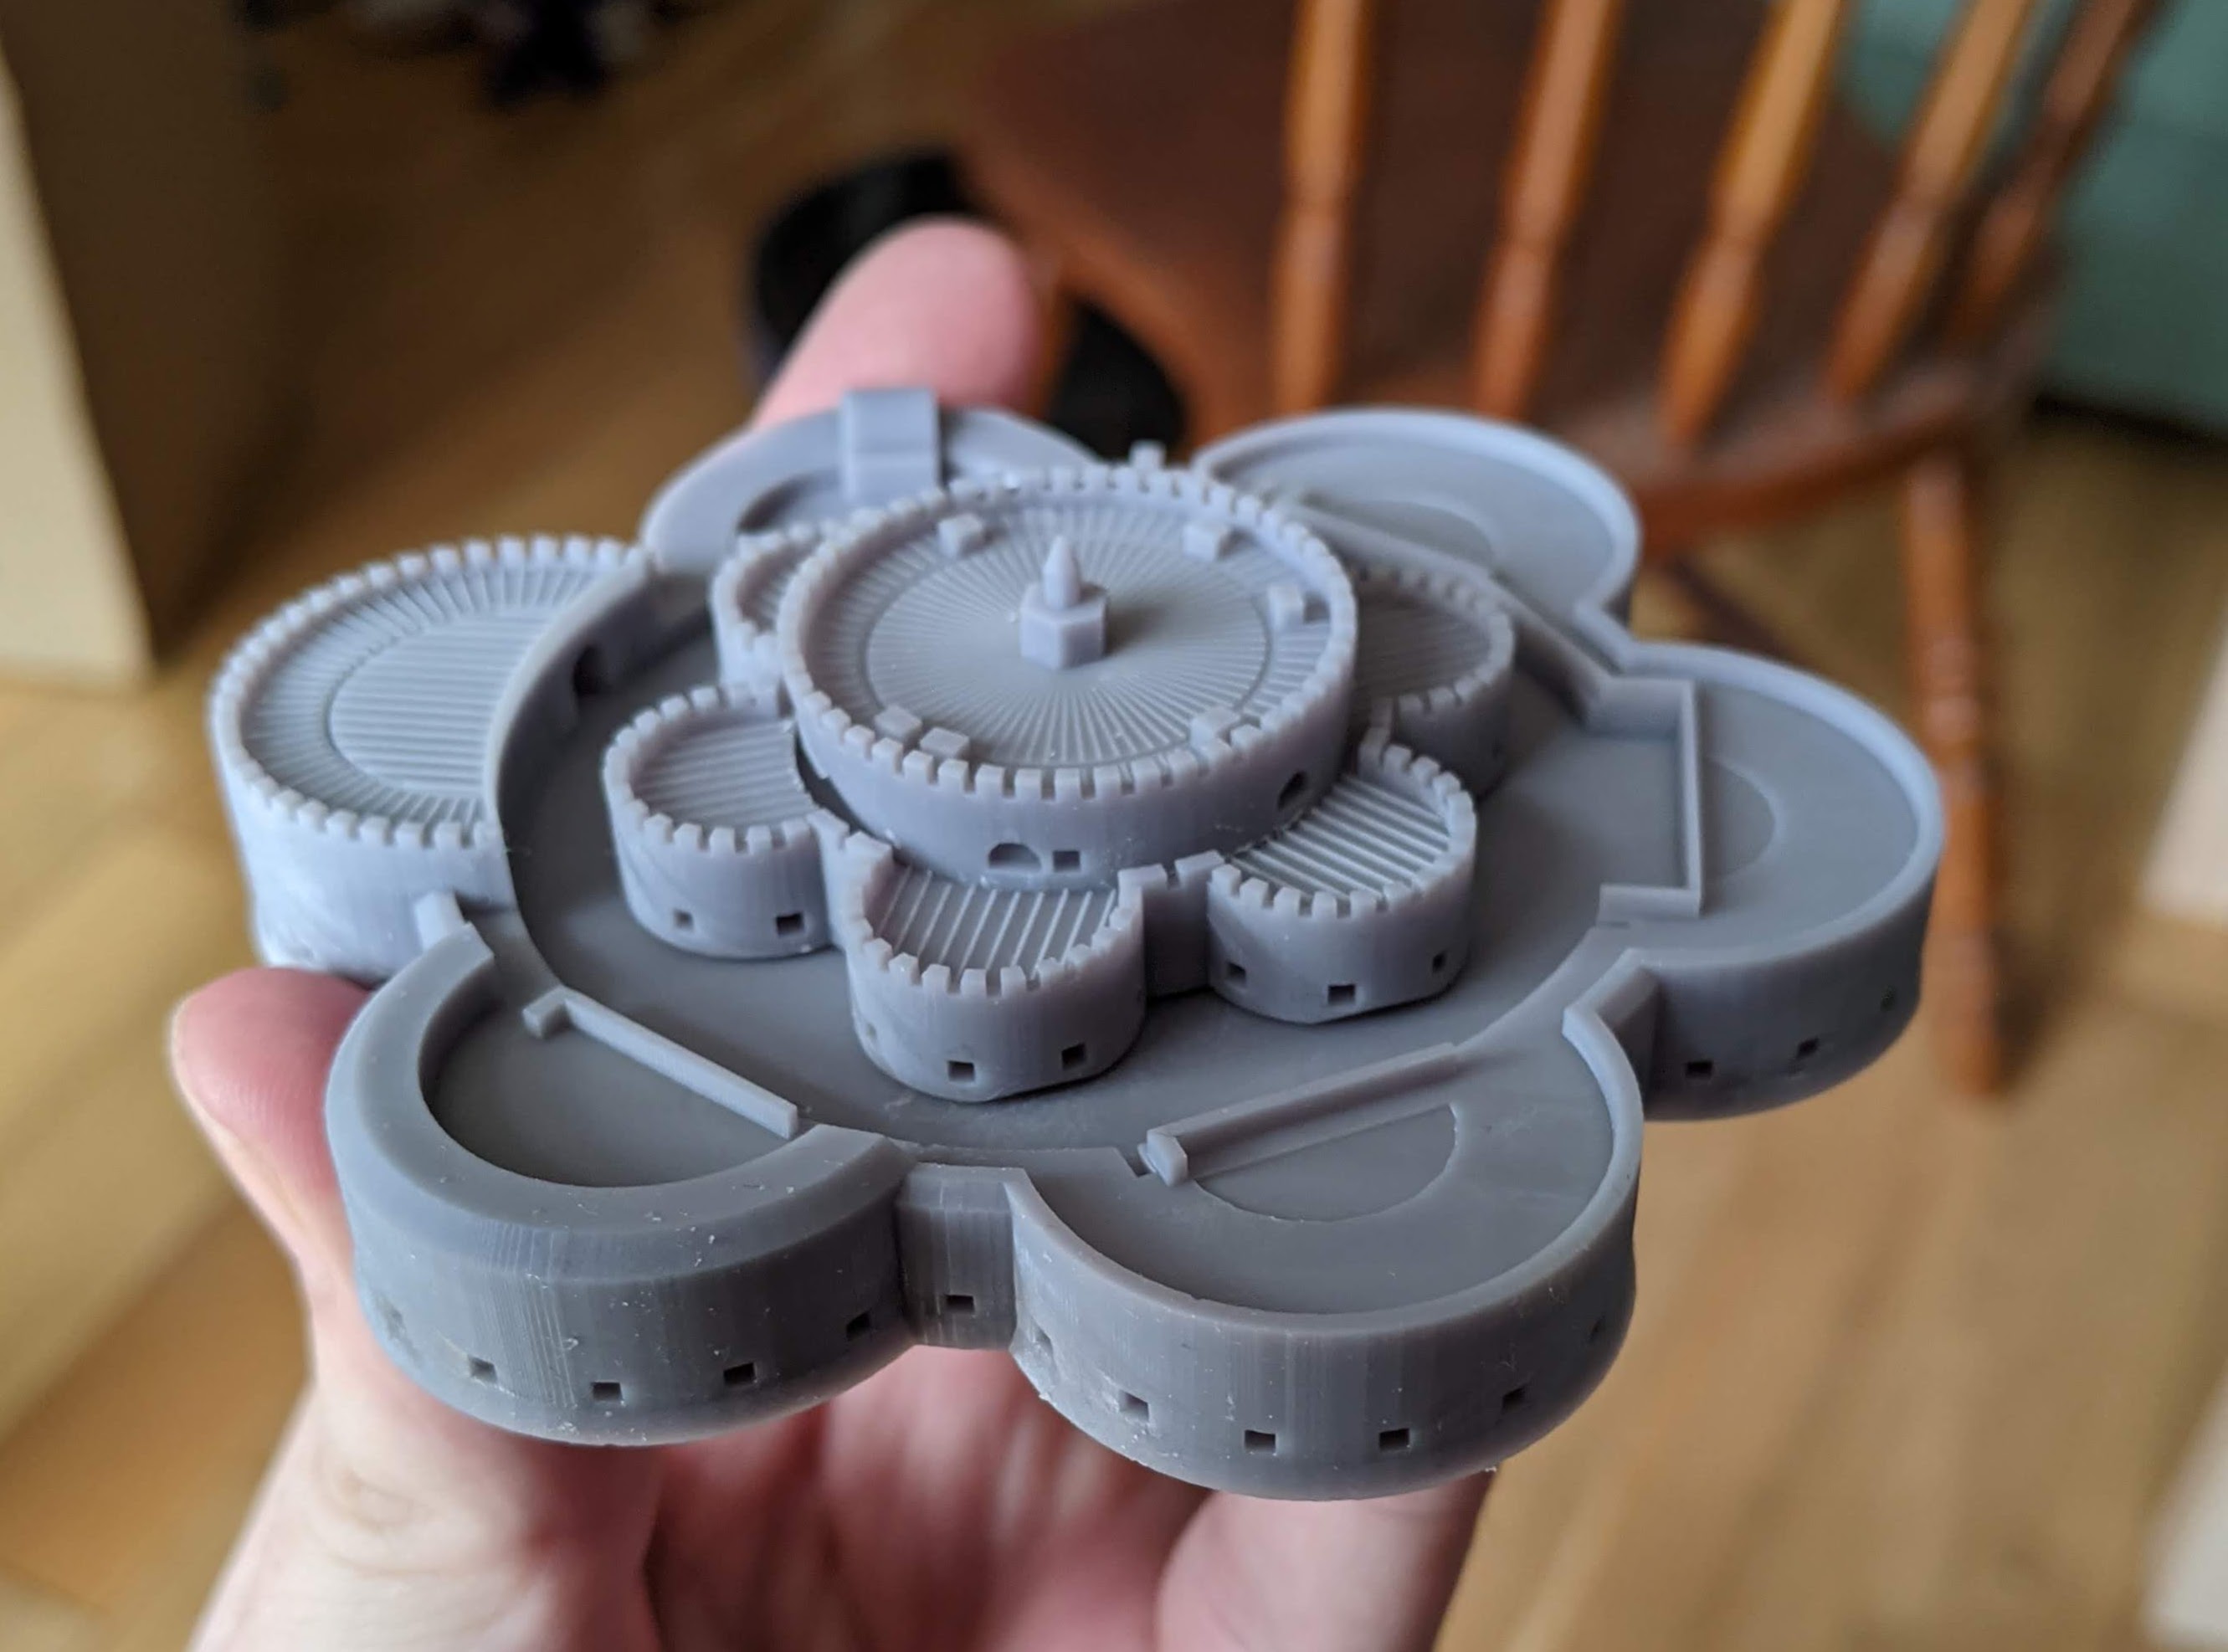
Back in the Before-Times, a beloved uncle who lives in Walmer gave me this handmade wooden model of Deal Castle as a wedding gift, which is really how this all started.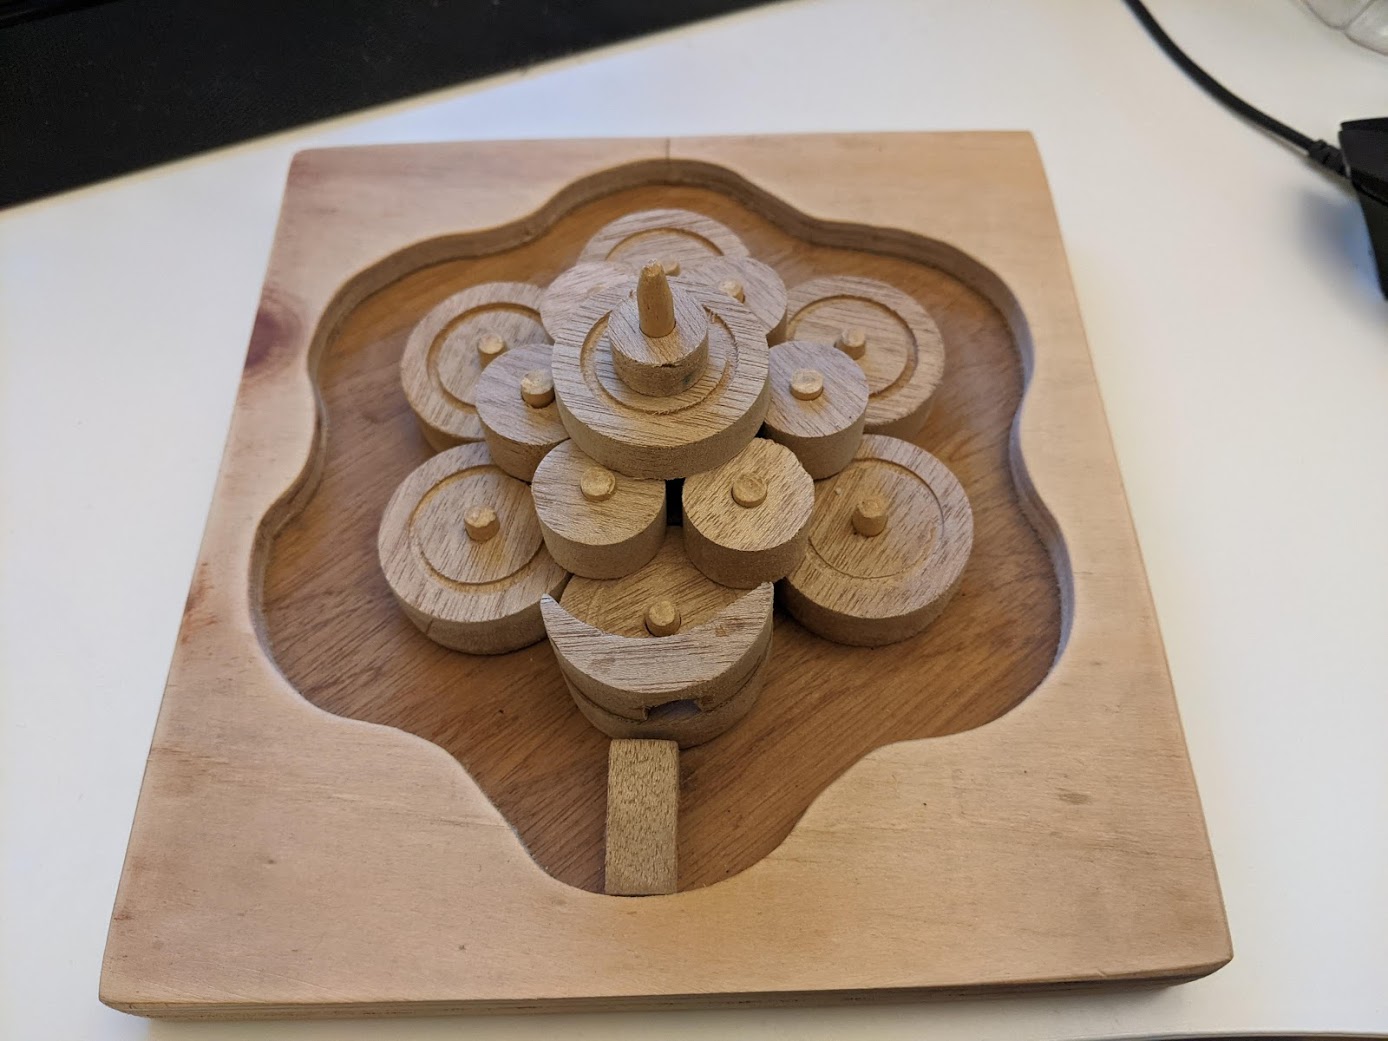
I love the Device Forts – they’re a bit before my usual historical period, but a striking, wonderful missing link between classic medieval castles and proper trace italienne gunpowder forts. I’ve always been quite keen on making tiny models, but unfortunately dyspraxia makes me far too clumsy for the sort of fine detail work So, inspired by various goings-on, including a friend on a Discord server having fun with his new 3d printer, I wondered if I could instead try my hand at crafting 3d models on a computer and leave the difficult “producing this in real life” part to machines. This coincided with me hearing about a technique called photogrammetry.


So, it was time to teach myself some CAD instead…
